Full-Stack Development With React and Java (Spring Boot): Complete 2025 Guide
Struggling with React and Java integration? This guide covers setting up your development environment, building a secure Java backend, and integrating APIs with React. Master the process with practical steps. Start now!
Hey there, future full-stack developer!👋
React on the frontend + Java on the backend. This powerful stack is the backbone of many enterprise systems, Master the tech effortlessly and get ahead.
If you wish to be adept at this modern high-demand tech stack, you are in the right place. This complete 2025 Java & React development guide gives you a clear roadmap to mastery. Let's begin.
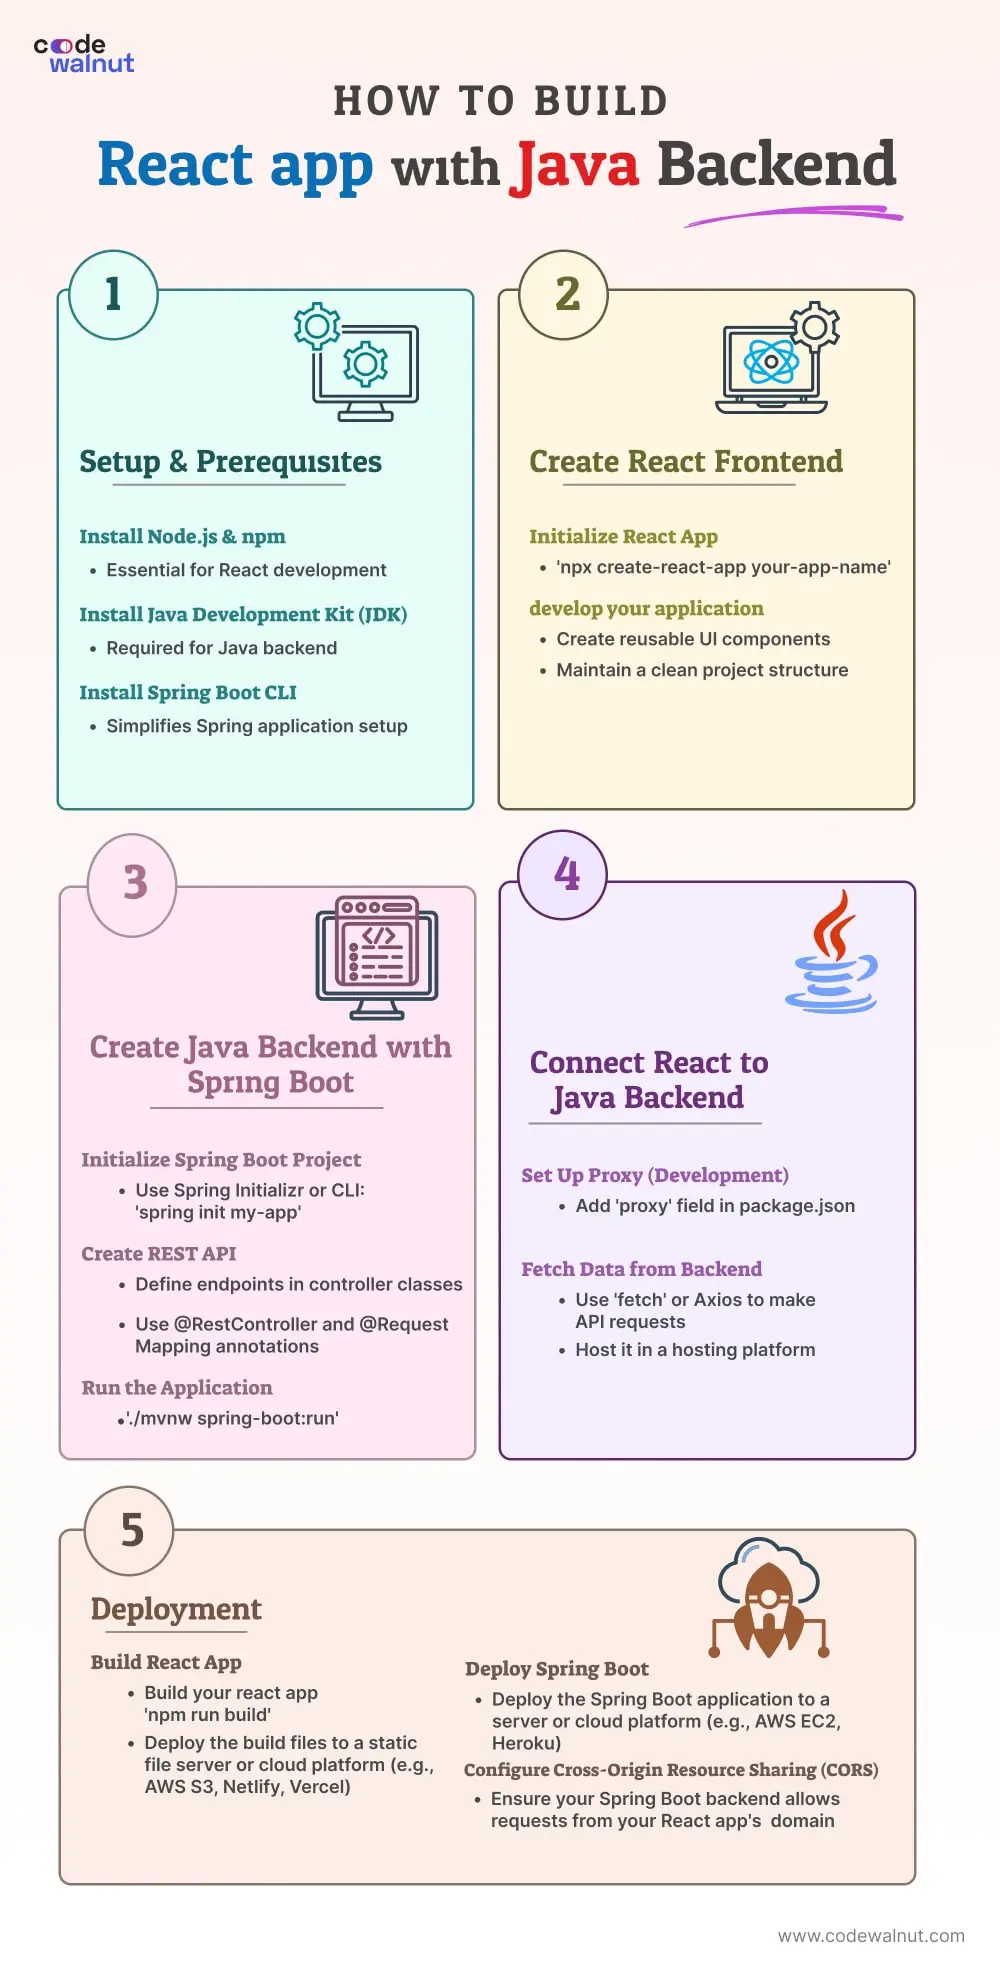
In this guide, you'll learn how to set up your development environment, build and secure REST APIs, connect React with your Java backend, manage authentication, deploy applications, and much more. Whether you're a beginner or upgrading your knowledge, this is the step-by-step resource you've been waiting for. 🚀
Ready to build your first full-stack app with confidence? Let’s get started
Understanding the Basics of React and Java
Before diving into the implementation, it's essential to grasp why React and Java make such a powerful full-stack combination
React.js, the popular JavaScript library for building user interfaces, excels in speed, modularity, and reusability. When integrated with a robust Java backend powered by Spring Boot, you unlock the full potential of enterprise-grade performance and seamless API communication.
Let's start with the fundamentals.
React is a JavaScript library for building user interfaces, primarily maintained by Facebook and a community of individual developers and companies.
Java, on the other hand, is a versatile and powerful programming language used for building server-side applications. Combining React's front-end capabilities with Java's back-end robustness unlocks a world of possibilities.
Setting Up Your Development Environment
Before building a powerful full-stack web application using React with a Java backend, it’s essential to set up a robust and compatible development environment. You need the right tools and configurations to ensure smooth integration between frontend and backend technologies.
For React Development
Java Backend Development Environment Setup
To successfully build and integrate a Java backend with your React frontend, setting up the Java development environment is crucial. This section walks you through installing the JDK, setting up environment variables, selecting a Java framework, and choosing the right IDE for backend development.
Select an IDE for Java Development:
For maximum productivity, choose a powerful Java IDE:
- IntelliJ IDEA (recommended for Spring Boot & Quarkus)
- Eclipse
- VS Code with Java extensions
Your IDE should support Maven/Gradle, Spring Boot starters, and Java syntax highlighting for optimal workflow.
With your development environment ready, you're all set up to start building robust backend APIs and integrating them with your React frontend. In the next sections, we'll delve deeper into each aspect.
Building the Java Backend for Your Full-Stack Application

The backend is the foundation of your full-stack application. It’s where all the logic, data management, and API request handling take place. When building a React application with a Java backend, choosing the right framework is crucial for performance, scalability, and long-term maintainability.
Choosing the Right Java Framework
Your Java backend framework determines how efficiently your APIs are built, how your services scale, and how your app integrates with databases and cloud platforms. Here’s a look at the top frameworks for building a Java backend in 2025.
Spring Boot – The Top Choice for RESTful APIs :
Spring Boot is widely recognized as the most developer-friendly and production-ready Java framework, especially for building REST APIs that connect seamlessly with React frontends.
Why Choose Spring Boot?
- Spring MVC: Simplifies the development of web applications with a robust model-view-controller architecture.
- Spring Data JPA: Eases the implementation of data access layers by using JPA (Java Persistence API) to interact with databases.
- Spring Security: Provides comprehensive security services for Java EE-based enterprise software applications.
- Spring Cloud: Facilitates the development of distributed systems and microservices with cloud-native features.
- Spring Batch: Designed for processing large volumes of data, it supports batch processing essential for enterprise-level applications.
- Micronaut: A modern, JVM-based framework designed for building modular, easily testable microservice and serverless applications with fast startup times and low memory footprint.
Spring Boot offers rapid development, a massive community, and strong documentation. Making it ideal for developers building modern, full-stack applications with React and Java backend.
Java EE (Jakarta EE) – Enterprise-Scale Development
If you're working on enterprise-grade applications, Java EE (now Jakarta EE) offers a set of standardized APIs that are perfect for large teams and corporate systems.
Key Java EE Tools:
- JAX-RS (Java API for RESTful Web Services): Simplifies the creation of RESTful web services and clients.
- EJB (Enterprise JavaBeans): Provides a scalable, transactional, and multi-tiered architecture for building enterprise applications.
- JSF (JavaServer Faces): A framework for building component-based user interfaces for web applications.
- JPA (Java Persistence API): Manages relational data in applications using object-relational mapping.
- CDI (Contexts and Dependency Injection): Helps manage the lifecycle and interactions of stateful components in a loosely coupled way.
Java EE is best suited for regulated industries or legacy environments requiring strict compliance and standardization.
Quarkus – Kubernetes-Native Java Framework
A Kubernetes-native Java stack, Quarkus is well-suited for cloud-native applications. It stands out for its fast startup times and low memory consumption, making it an excellent choice for microservices. Some of the frameworks it includes are:
- SmallRye MicroProfile: Implements the MicroProfile specifications to optimize Java EE applications for microservices architectures.
- RESTEasy: A REST framework to build web services and RESTful applications.
- Hibernate ORM with Panache: Simplifies the development of data access layers with a more user-friendly API.
- Vert.x: Provides a toolkit for building reactive applications on the JVM.
- Kafka: Integrates with Apache Kafka to handle real-time data feeds and streaming applications.
Each of these frameworks has its strengths and is well-suited for specific use cases. In our case, we will use Spring Boot.
Setting Up Spring Boot for Your Java Backend
To build a powerful and scalable Java backend for your React application, you need to set up your Spring Boot project correctly. While there are several ways to create a Spring Boot application, the most efficient and beginner-friendly method in 2025 is using Spring Initializr. A web-based project generator maintained by the Spring team.
1. Create a New Spring Boot Project with Spring Initializr:
- Go to the Spring Initializr.
- Configure your project:
- Project: Maven or Gradle
- Language: Java
- Spring Boot Version: Select the latest stable version
- Project Metadata:
- Group: com.example
- Artifact: my-spring-boot-app
- Name: my-spring-boot-app
- Packaging: Jar
- Java Version: 17, 21 or Later
2. Add Dependencies:
- In the Dependencies section, add:
- Spring Web
- Spring Data JPA
- H2 Database (for an in-memory database)
- Add additional dependencies according to your project's needs.
3. Generate the Project:
- Click the "Generate" button to download a ZIP file containing your new Spring Boot project.
- Extract the ZIP file to your desired location.
4. Import the Project into Your IDE
- Open Your IDE:
- Launch IntelliJ IDEA, Eclipse, or your preferred IDE.
- Import the Project:
- In IntelliJ IDEA:
- Click File > Open and select the project folder.
- In Eclipse:
- Click File > Import > Existing Maven Projects and select the project folder.
- In IntelliJ IDEA:
Understanding the Spring Boot Project Structure
After generating your backend application using Spring Boot, it’s important to understand the default project structure. Familiarity with each directory and file will help you effectively manage code, configurations, and dependencies throughout your Java backend development.
Here’s a breakdown of the key components of a typical Spring Boot project structure:
Explanation:
- The @RestController annotation indicates that this class will handle HTTP requests and return JSON responses.
- The @GetMapping("/hello") annotation maps HTTP GET requests to the /hello URL path to the hello() method.
- The hello() method returns a simple "Hello World" message as a response.
Database Integration in Spring Boot
To enhance the functionality of your Spring Boot backend, integrating a database is essential. A database allows your application to store, retrieve, and manage dynamic data. Whether you're saving user information, messages, or other records.
In this section, we’ll demonstrate how to configure a simple in-memory H2 database to perform basic CRUD operations (Create, Read, Update, Delete) using Spring Data JPA, which simplifies database interactions in Java backend development.
By completing these steps, you've successfully integrated an H2 database into your Spring Boot application and implemented basic CRUD operations. Laying the groundwork for scalable data handling and advanced business logic in your Java backend.
Security and Authentication in Spring Boot
Securing your Java backend is critical to protect your application, user data, and RESTful APIs from unauthorized access and vulnerabilities. A secure backend ensures the integrity and confidentiality of your full-stack application built with React and Spring Boot.
Key security practices include:
- Using Spring Security with OAuth2 or JWT (JSON Web Token) for stateless authentication and secure session management.
- Configuring method-level and URL-based authorization using annotations like @PreAuthorize and custom role-based access control.
- Protecting the application from common web vulnerabilities such as Cross-Site Scripting (XSS) using content security policies and output encoding, and Cross-Site Request Forgery (CSRF) through built-in CSRF protection mechanisms, especially for state-changing operations in web apps.
In this section, we’ll create a simple security configuration using Spring Security and Basic Auth for authentication.
With these steps completed, you now have a secure and fully functional Java backend capable of handling data persistence and REST API requests. Paving the way to integrate it with your React frontend and build a robust full-stack web application.
Developing the React Frontend With Java Backend API Integration

Creating a high-performing React frontend involves more than just writing components. It requires seamless API integration with your Java backend to deliver a smooth, data-driven user experience. As Bhargav Bachina, founder of Bachina Labs, suggests, combining React with a Spring Boot backend is one of the most effective approaches for building dynamic web applications.
Be sure to consider responsive UI design, accessibility, and deployment best practices (e.g: on AWS or Vercel) to enhance both performance and user engagement.
We'll now focus on integrating a React frontend with the Java backend we created. This is not a React learning tutorial, so we won't delve deeply into React concepts. Instead, we'll concentrate on how to connect your React app with the Java Spring Boot APIs we've built. We already covered how to set up a react project. Now, let's focus on how to connect our React frontend to the Java backend we created.
Communicating with the Backend
To retrieve or send data between your frontend and backend, you’ll make HTTP API requests from your React components. This is typically done using tools like:
- Axios (preferred for its simplicity and built-in error handling)
- Fetch API (native alternative)
- Redux Toolkit Query or React Query (for advanced state and cache management)
Here's a simple way to use Axios to make an API call from your React component to a Spring Boot endpoint:
User Interface (UI) and User Experience (UX)
Creating a responsive, accessible, and visually appealing user interface (UI) is critical to the success of any modern full-stack web application. Your frontend is the first thing users interact with, and delivering a seamless user experience (UX) is key to improving engagement, retention, and conversions.
Whether you're using React with a Java backend or another full-stack combination, following established UI/UX best practices ensures that your application performs well across devices and meets the expectations of today’s users.
Key UI/UX Considerations for Full-Stack Web Applications:
- Design for Mobile Responsiveness
Ensure your app looks and functions great on all devices. Desktops, tablets, and smartphones.- Use responsive CSS frameworks like Tailwind CSS or Bootstrap.
- Implement media queries to adapt layouts and elements to different screen sizes.
- Test using mobile-first development tools and browser dev tools.
- Use responsive CSS frameworks like Tailwind CSS or Bootstrap.
- Use UI Libraries to Accelerate Development
Speed up your development process and maintain design consistency by leveraging proven React UI component libraries:- Material-UI (MUI): Provides pre-built components following Google’s Material Design guidelines.
- Ant Design: Offers enterprise-class UI components ideal for dashboards and complex apps.
- shadcn/ui: A modern, customizable React component library built on top of Radix UI and Tailwind CSS, focusing on flexibility and developer experience.
- Material-UI (MUI): Provides pre-built components following Google’s Material Design guidelines.
These libraries save time, reduce CSS clutter, etc.
- Enhance UX Through Speed and Clarity
Fast-loading, easy-to-navigate applications improve user satisfaction and SEO performance.
- Optimize performance by code-splitting and lazy loading React components.
- Keep navigation simple and intuitive with clear labels and logical user flows.
- Use loading indicators, animations, and microinteractions to guide users and improve perceived performance.
- Optimize performance by code-splitting and lazy loading React components.
- Maintain Visual Consistency
- Choose a clean and consistent design system with a unified color palette, typography, and spacing.
- Ensure branding elements such as logos and icons are consistently applied throughout the application.
- Stick to a limited set of component styles to reduce visual clutter and cognitive load.
- Choose a clean and consistent design system with a unified color palette, typography, and spacing.
- Accessibility and Inclusiveness
- Use semantic HTML and ARIA attributes for better screen reader support.
- Ensure proper contrast ratios and keyboard navigation support.
- Test your UI with tools like Lighthouse and axe DevTools to meet WCAG 2.1 standards.
- Use semantic HTML and ARIA attributes for better screen reader support.
- Error Handling
- Display meaningful error messages and success alerts using Toast or Snackbar components.
- Avoid silent failures. Communicate clearly and visually when something goes wrong.
- Display meaningful error messages and success alerts using Toast or Snackbar components.
Why UI/UX Optimization Matters for React + Java Apps
A well-crafted frontend UI, backed by a powerful Java Spring Boot backend, results in a full-stack application that not only functions well but also feels premium and professional. Investing in design and UX enhances:
- User retention and engagement
- SEO rankings through better performance and accessibility
- Conversion rates for products, services, or signups
In 2025, user expectations are higher than ever. An intuitive and user-friendly interface can set your React and Java application apart from the competition.
Common Pitfalls in React + Java Spring Boot Integration (And How to Fix Them)
When building modern web applications with React as the frontend and Java Spring Boot as the backend, developers often encounter tricky integration challenges. These can slow down development, introduce bugs, or cause frustrating runtime issues. Below are the most common pitfalls and how to avoid them.
Deployment Strategy
For deploying a full-stack React and Spring Boot application, the ideal strategy in 2025 includes containerization using Docker, orchestrating with Kubernetes, and automating deployments via CI/CD pipelines (e.g: GitHub Actions or GitLab CI). React can be served as static assets from the Spring Boot app or deployed separately on platforms like Netlify or Vercel, while Spring Boot can run on cloud services like AWS, Azure, or GCP.
For a detailed guide on scalable deployment, refer to this blog: Spring Boot Best Practices for Scalable Applications
How CodeWalnut Could Help you in Integrating Java With React frontend
Integrating Java with React in 2025 is a pivotal step in building modern, scalable web applications. CodeWalnut, a trusted name in software development, plays a vital role in bridging these technologies. With a team of experienced Java developers and React enthusiasts, CodeWalnut simplifies the fusion of these stacks, empowering your web projects in 2025.
Whether you're crafting a Spring Boot application, running React UI components, or securing your application using Spring Security, CodeWalnut's expertise shines through. By seamlessly integrating Java’s backend capabilities and React’s dynamic front-end prowess, CodeWalnut ensures your web apps are efficient, secure, and responsive.
Trust us to create modern user interfaces and manage databases using Spring Boot, elevating your full-stack web development game with confidence and reliability.
Key TakeAways
Effective Frontend-Backend Integration: Combining React.js with Java Spring Boot enables a powerful, scalable, and modern full-stack web development approach.
Efficient Java Backend with Spring Boot: Use Spring Boot to build secure, RESTful, and production-ready backend services with minimal configuration.
Responsive UI with React: Create fast, dynamic, and responsive user interfaces using the latest features in React 18+, ensuring an optimal user experience across devices.
Smooth API Communication: Use Axios or Fetch API in JavaScript to handle seamless communication between your React frontend and Spring Boot backend, ensuring real-time data exchange and CRUD functionality.
FAQs
1. What Are the Key Steps in Combining React.js and Spring Boot for a Full-Stack Web App?
Combining React.js and Spring Boot to build a full-stack web app involves several key steps. First, set up your Spring Boot project using Spring Initializr, including the necessary dependencies such as Spring Data for data access and Spring Security for security features. Create RESTful APIs to serve as the backend for your app. Then, use Create React App to generate your React frontend and make API calls to interact with the Spring Boot backend. Employ React Router for client-side routing and create UI components to present your data. Secure your app with Spring Security and handle authentication and authorization. This synergy between React and Spring Boot enables you to build powerful full-stack applications.
2. Can You Explain the Role of Spring Security in a React and Spring Boot Application?
In a React and Spring Boot application, Spring Security plays a crucial role in ensuring the security of your web application. It provides features like authentication, authorization, and protection against common web vulnerabilities such as CSRF (Cross-Site Request Forgery). By integrating Spring Security into your application, you can manage user authentication, secure your RESTful endpoints, and control access to different parts of your app. This is essential for protecting sensitive data and maintaining the integrity of your full-stack application.
3. How to Add React Components to a Spring Boot Application?
Adding React components to a Spring Boot application involves creating reusable pieces of UI that can be embedded in your frontend. To do this, first, build your React components in the `src` directory of your React app. Once you have your components ready, you can add them to your Spring Boot application by including the necessary HTML tags in your Thymeleaf templates or by serving the React app as a static resource. Make sure to import the appropriate CSS files and JavaScript code in your Spring Boot application to fully utilize the React components.
4. How to Secure a Full-Stack Java and React App Using OAuth and Okta?
To secure your full-stack Java and React app using OAuth and Okta, you can follow a step-by-step tutorial on GitHub. Okta provides a convenient way to handle authentication and authorization in your application. You'll use Okta's OAuth services to manage user identity and access control. By configuring Okta in your app, you can implement single sign-on (SSO), ensuring that only authenticated users can access your resources. This enhances the security of your app and simplifies user management.
5. What Are the Best Practices for Building a Simple CRUD Application with Spring Boot and React?
Building a simple CRUD application with Spring Boot and React involves following best practices. Start by creating a Spring Boot application with Spring Data, which simplifies database operations. Define your entity classes and repository interfaces to interact with the database. On the React side, use React Router for navigation and build components for Create, Read, Update, and Delete operations. Ensure proper error handling and validation. Maintain clean code separation between your backend and frontend for a scalable and maintainable application.
6. How Can I Handle the Business Logic in a Full-Stack Java and React Application?
Handling business logic in a full-stack Java and React application typically involves placing the core logic in the Spring Boot backend. Your React frontend should primarily focus on user interface components and client-side interactions. Use Spring MVC controllers in the backend to receive requests from the frontend, process data, and return results. By centralizing the business logic in the backend, you can ensure data consistency and maintain a clear separation of concerns between frontend and backend, making your application more organized and easier to maintain.
7. What Are the Steps to Integrate Bootstrap's CSS and Reactstrap's Components with a React and Spring Boot Project?
To integrate Bootstrap's CSS and Reactstrap's components with your React and Spring Boot project, first import the necessary stylesheets and scripts into your React application. You can do this by including the links to Bootstrap's CSS and JavaScript files in your HTML templates. Next, install Reactstrap and add its components to your React components. Reactstrap provides pre-built components styled with Bootstrap, which you can customize as needed. This integration allows you to create a visually appealing user interface for your full-stack application while leveraging the power of React and Spring Boot for the backend functionality.
Get in touch - Our team has developed scalable solutions for enterprises and has a Crunch rating of 4.9⭐.


Experience coding prowess firsthand. Choose CodeWalnut to build a prototype within a week and make your choice with confidence.
Accelerate your web app vision with CodeWalnut. In just a week, we'll shape your idea into a polished prototype, powered by Vercel. Ready to make it real? Choose us with confidence!
Dreaming of a powerful web app on Heroku? Let CodeWalnut bring it to life in just one week. Take the leap and trust us to deliver with confidence!
Related topic
Draw Diagrams Using Agent Skills
Automate architecture, workflow, and system design diagrams using agent skills. Enable your AI agent to generate consistent, high-quality technical visuals directly from prompts, reducing manual effort and improving documentation speed.

React Coding Masterclass — Foundations Edition
Learn React best practices used by senior engineers. This React Coding Masterclass covers semantic HTML, naming conventions, declarative programming, architecture patterns, and SOLID principles for building clean, scalable React applications.
.webp)
Best 5 AI Code Review Tools: Complete Comparison with Real Data
A comprehensive, evidence-based comparison of the top 5 AI code review tools in 2025 - analyzing pricing, security compliance, user reviews, case studies with hard ROI numbers, and integration ecosystems to help engineering teams choose the right tool for their specific needs.


 When to Hire CodeWalnut?


